
 Sarah
Sarah
This post may contain affiliate links. If you click on one of these links and decide to make a purchase or a booking, I do earn a small commission from that at no extra cost for you. For full disclosure, check my affiliate disclaimer.
So you decided to start a blog as well? That’s awesome!
Starting a blog can be a pretty overwhelming task in the beginning – and that’s why I want to help you
However, it is definitely worth it! I also published an article about why I quit my corporate job and became a travel blogger and about how we grew our blog to 50,000 monthly page views within just one year of blogging.
When starting out I read like a million articles about how to start a blog, how to promote it and which plugins to use during the process. Some of those articles were really good while some were getting me even more confused.
But almost all of them required me to read multiple articles to figure out all the steps you need to take. So I decided to write a complete article about how I set up my blog (that you are reading right now) and how to easily do that too!
Hopefully, this will answer all of your questions about how to easily set up a blog! If you still need help, don’t hesitate to write me an email or contact me on Instagram (@fernwehsarah)!
Table of Contents
Pin this for later!
Get a WordPress-ready web hosting (and a domain)
The first step you need to take in order to start a blog is getting some web hosting. Why? Because you will need to do self-hosted WordPress in order to start a blog that you can really customize and that has the potential to earn you money too!
Don’t fall for WordPress.com! You definitely want to start clean with self-hosted WordPress.org, believe me! I read that before as well, ignored it and then had to face the consequences of having to migrate my blog. It’s possible – but save yourself the work and be smarter than me!
There are different types of web hosting available – but I would advise you to use one the few hosters officially recommended by WordPress (and millions of bloggers!). Those hosters make it possible to install WordPress on your web hosting with one click – so you don’t really have to know anything about how to set it up! I think it was even quicker and easier than registering for wordpress.com (and cheaper in the end…).
And here’s the good news: Webhosting isn’t expensive at all with those hosters! I personally use Bluehost and I am really happy with them!
My recommendation: Bluehost
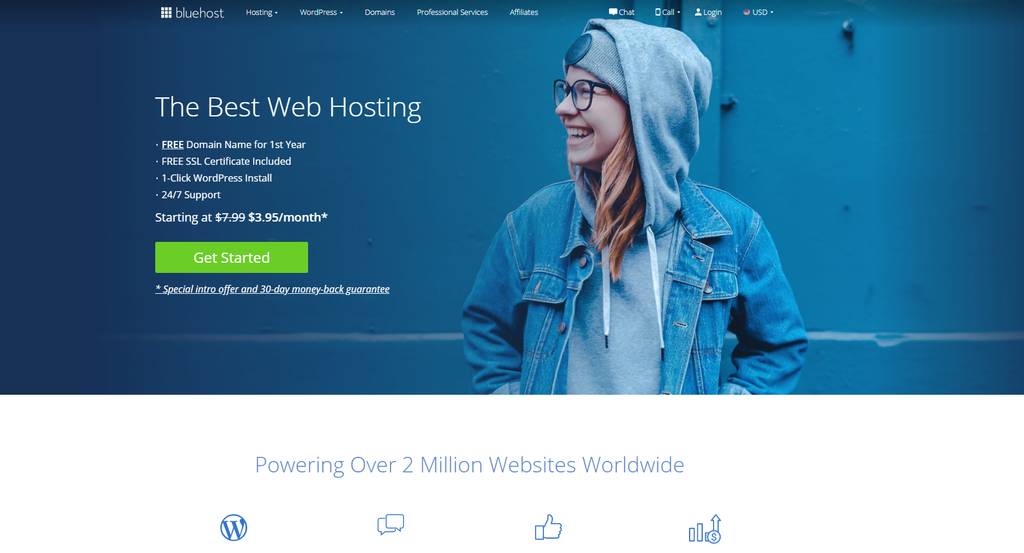
Bluehost is a well-established web hoster for WordPress and offers a one-click installation of WordPress. It’s also officially recommended by WordPress, so you can’t go wrong with it!
Bluehost’s plan also includes a free domain and a free SSL certificate – so you don’t even to buy a separate domain or pay for that certificate!
I use Bluehost’s plus plan as I also host a few smaller websites/blogs – but if you only want one website, you can get the basic plan too.
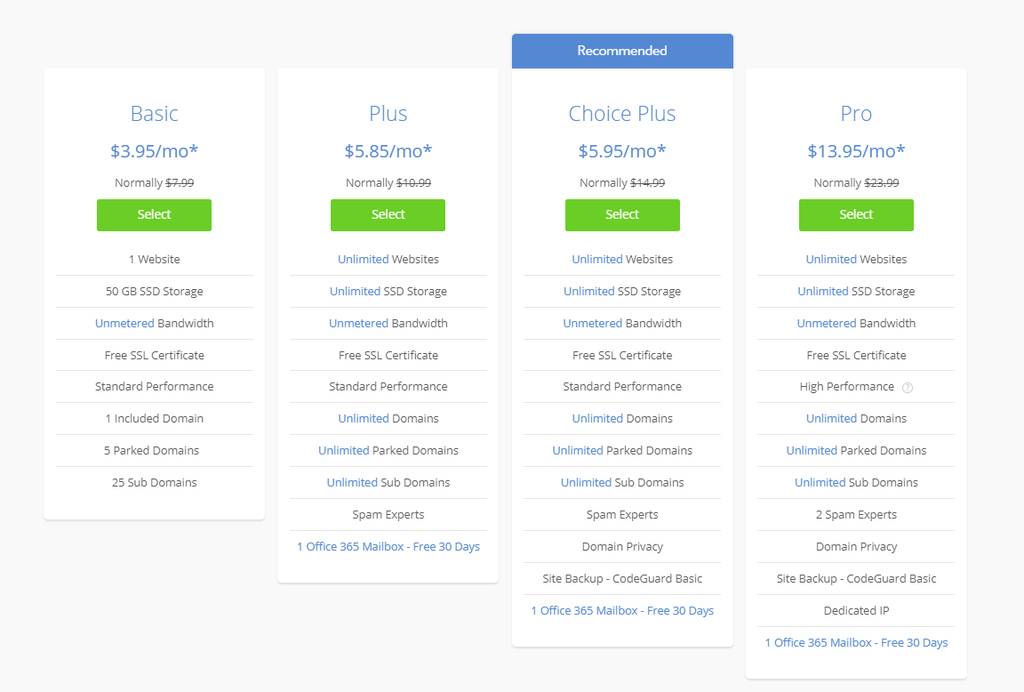
And here’s the great news – I contacted Bluehost and my link below, you can get a special discount for readers of Fernwehsarah and get hosting for 3,95$/month instead of 7,99$/month + a FREE Domain + SSL certificate!
Signing up is really easy – and Bluehost will guide you through the whole process seamlessly.
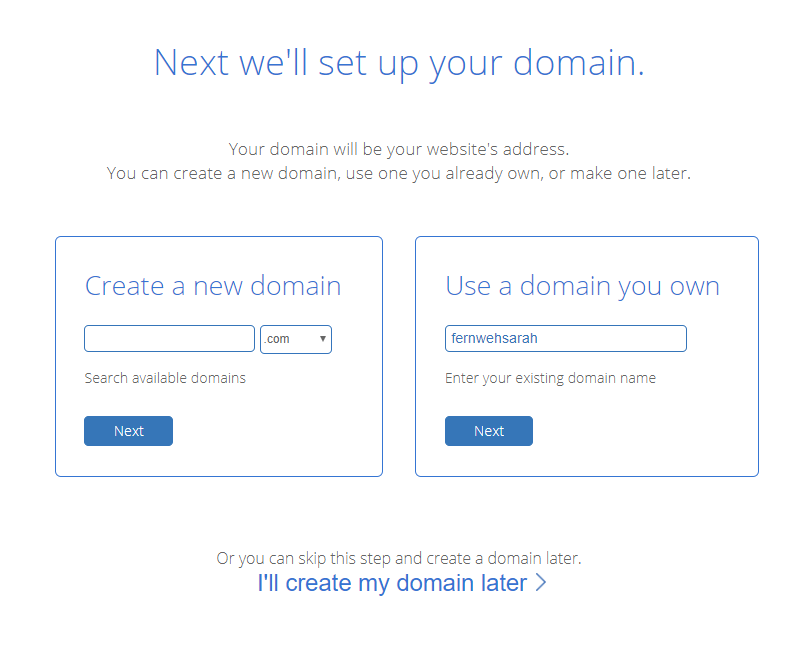
First, you can select your domain, use an existing one, or even skip the domain selection step if you don’t know your blog name yet! (That last one is something that only Bluehost offers!)
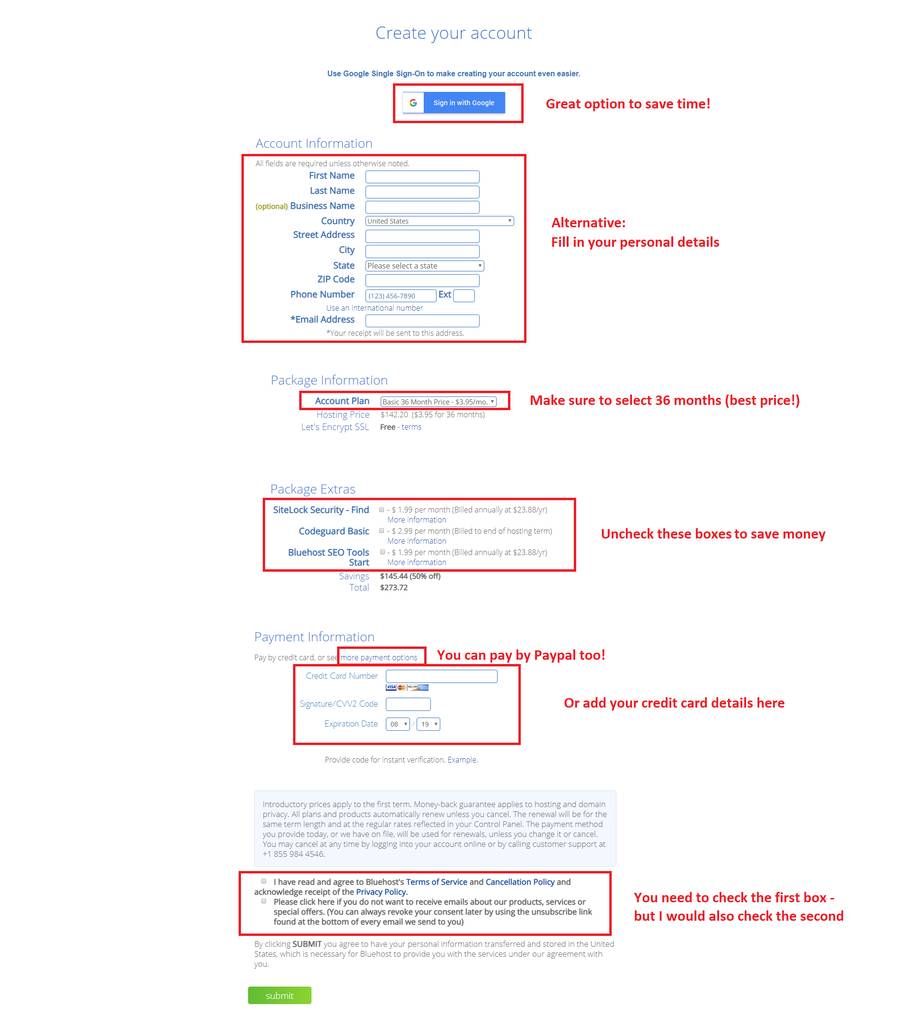
Now it’s time to fill in the personal details and select some options.
Make sure to sign up for 36 months because this will give you the cheapest price. I personally would uncheck all “package extras” – you don’t need them and they aren’t worth the extra cost in my opinion!
And since it’s a bit hidden: You can also pay by Paypal if you don’t have a credit card. Just click on “more payment options”
Afterward, you can directly install WordPress with just one click. Bluehost will do all the work for you and it takes less than 5 minutes usually until you can access your WordPress dashboard!
See, that was really easy! That’s why I recommend Bluehost to everyone – and should you ever have any problem: Their support staff is really awesome and super quick!
Register any additional domains with Namecheap
Your Bluehost plan already comes with a free .com domain, so there’s a high chance that you can skip this step completely.
In case you want to have any additional Domains, you can either buy them through Bluehost directly or use another provider.
The reason why I would recommend using Namecheap.com for additional domains is that their prices are lower. A second .com Domain would be 8.88$/year with them – while Bluehost charges 15.99$/year for additional domains.
Namecheap.com is really easy to navigate, has a quick customer support and low prices – that’s why I think they are a great choice for additional domains.
You will see a lot of bloggers recommend GoDaddy.com (because of their high affiliate payouts…) – however, if you compare the prices you will see that they are much more expensive from the second year on (18.99$/year).
I think it is dishonest to promote services like this just for their higher affiliate payout – and I promise, I will NEVER do that! (That’s also why I will recommend using Thrive Leads over Convertkit in the plugin section)
Get a blogging course to jumpstart your journey!
One key mistake that I did in the beginning was thinking that I can do everything alone and without the help of experienced bloggers.
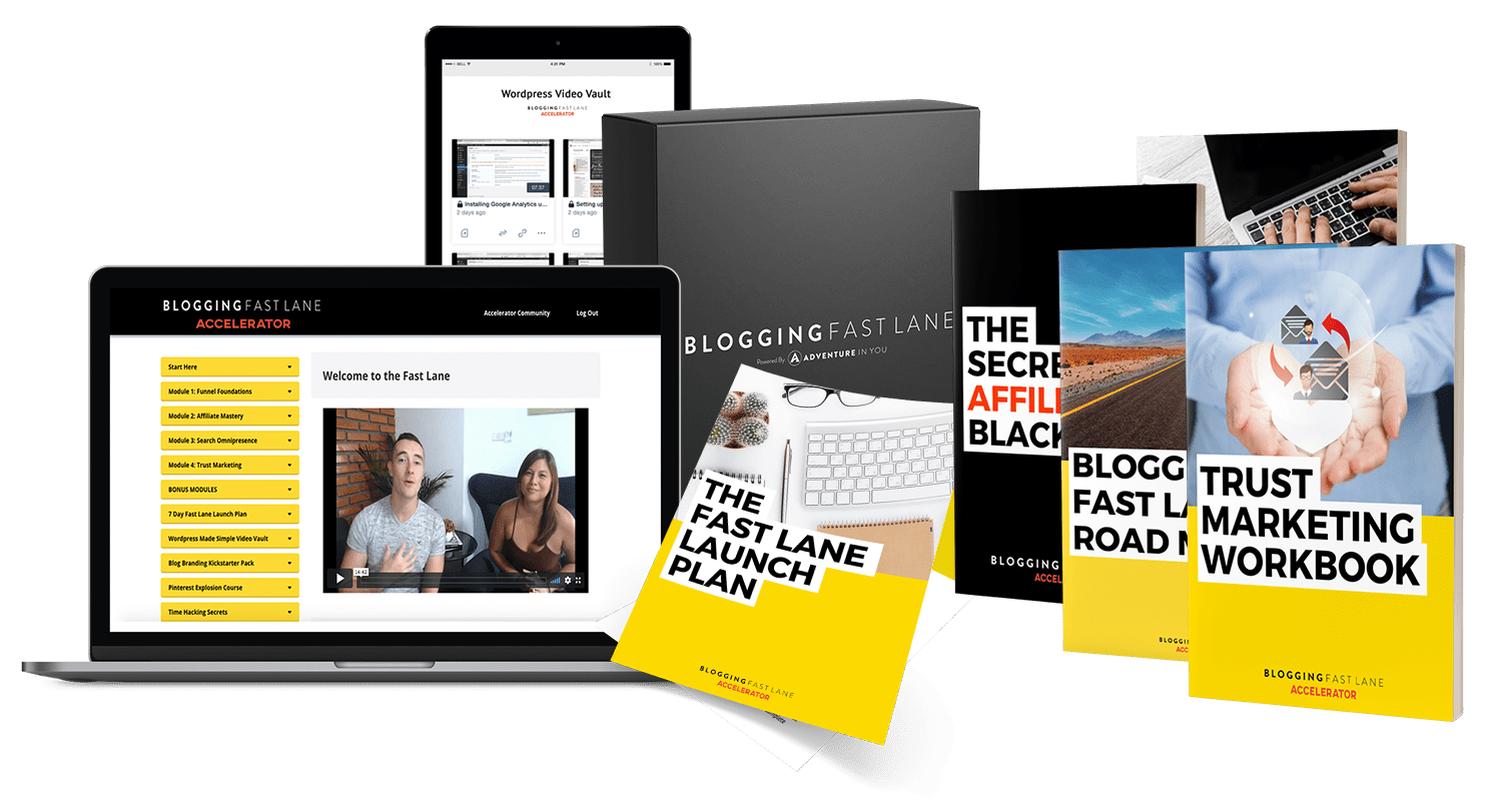
I couldn’t have been more wrong. In our post about how we got 50k monthly sessions within one year of blogging we show in detail what happened after we bought the Blogging Fast Lane – a blogging course by Anna and Tom (AdventureInYou). Numbers don’t lie – this investment was the best I could have done!
We also published an extensive review of the Blogging Fast Lane, including screenshots from the actual course website.
One of the really cool things for a blogger that just starts out is that the Blogging Fast Lane also has plenty videos explaining WordPress really well. Plus, there is a whole section on how to start a blog, including workbooks and checklists!
Read: The Blogging Fast Lane – and why you should get this blogging course
And Anna and Tom even offer a totally free webinar in which you can get to know them and their concept for the Blogging Fast Lane (their course).
Choose a WordPress theme
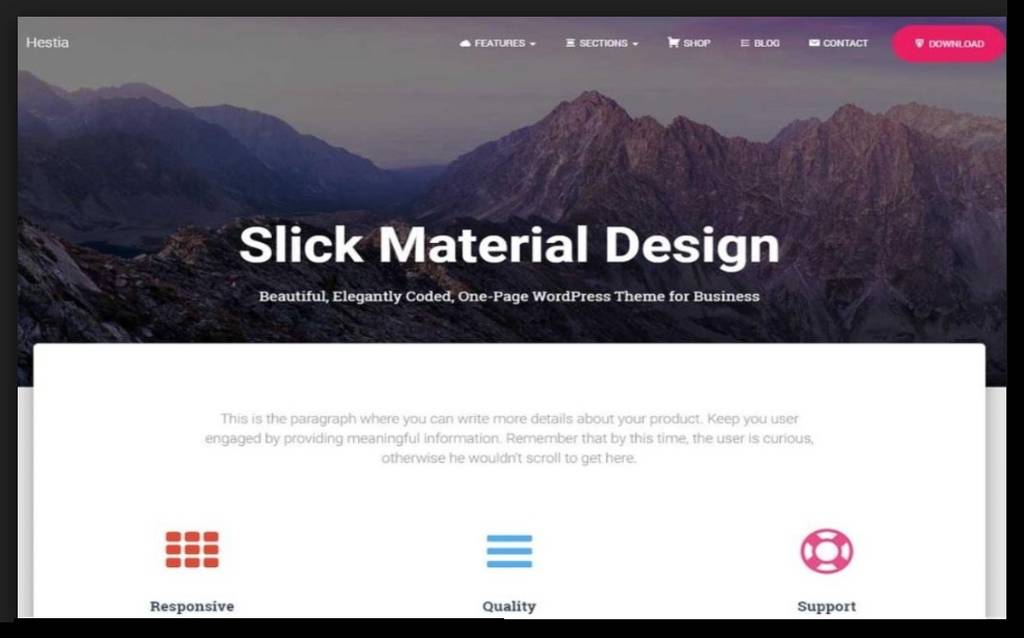
Now it’s time to choose your WordPress theme! A WordPress theme determines, how your blog will look in general. So this is an important decision!
However, you can always switch to another theme later – so don’t stress yourself too much about which to choose to start your blog with! Just pick one and go on to the next step
Here’s a few free themes that you can’t go wrong with:
- Astra (I am currently using this one)
- Hestia (I started with it)
- OceanWP
- GeneratePress
CodeWP has compiled a really awesome list of free WordPress themes in 2019 for different websites!
Do I need a premium theme?
A lot of bloggers recommend starting a blog with a premium (paid) theme directly. I think you can also start with a free one and get used to everything first.
But if you want to start premium I would go for ThemeIsle Themes as they offer more than 40 premium themes and they are known for being very well programmed. It comes at 89€ – but that also includes all of their premium plugins – which makes it a pretty neat deal.
And you may be surprised to hear that in July 2019 I ditched my paid premium theme with pipdig (because of their scandal) and went back to a free theme as well (Astra)!
The reason why I didn’t buy a new premium theme? Because I am using the theme builder from Elementor and creating my own footer, header anyway.
Elementor Pro: An alternative to a premium theme?
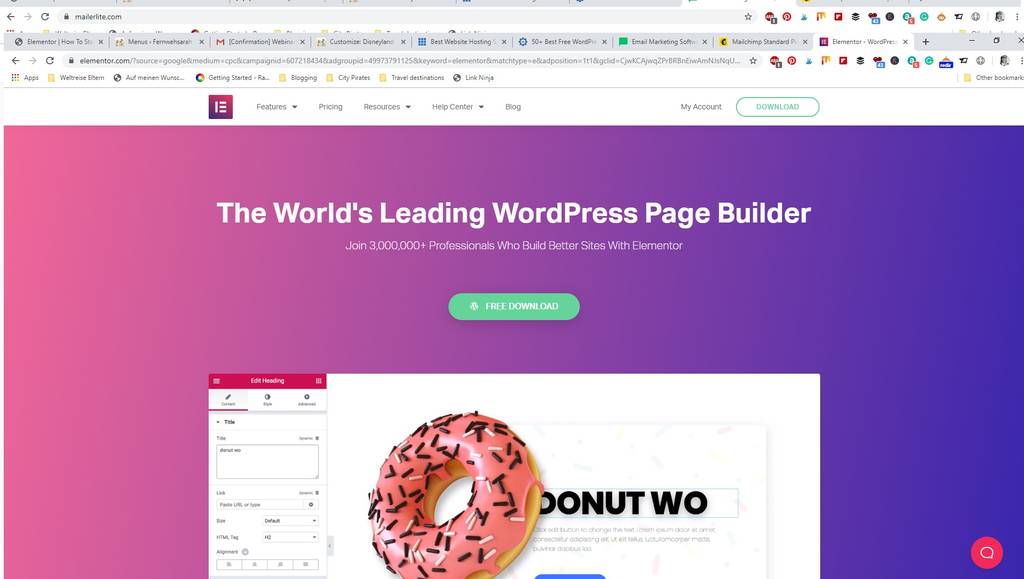
Elementor Pro is the paid version of the free page builder Elementor.
And by using Elementor Pro, you do not only get additional blocks for the page builder – you also get a popup builder and a theme builder! That means you can customize EVERYTHING on your page with an editor that is easy to use.
I absolutely LOVE Elementor (and I think they are selling if way to cheap) – but if you are just starting with your blog, you might be overwhelmed by using their theme builder.
So my recommendation would be: Start with a free theme and the free version of Elementor. Get used to the page builder and to WordPress in general. And once you want to take your site design to the next level: Get Elementor Pro and start customizing your blog as you have never thought is possible!
Change some general WordPress settings
There are a few things I would recommend to check/change in the general settings of WordPress when you start a blog. It will be terrible to change some of those at a later point – so better do it now after choosing your theme.
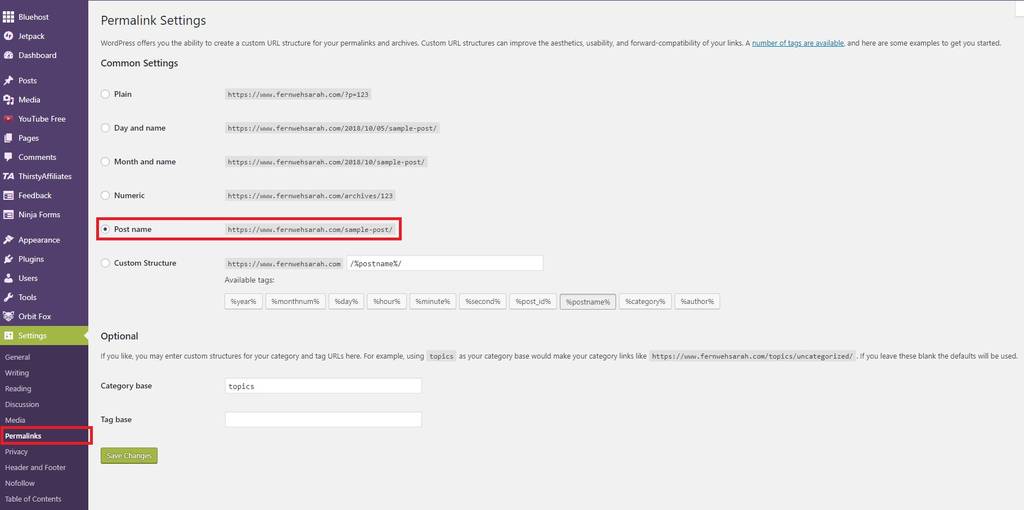
First is the permalink structure: The permalinks structure determines which links will lead to your new blog post. It is usually set to include the date – which is a terrible choice! You should definitely change it to “Post name”
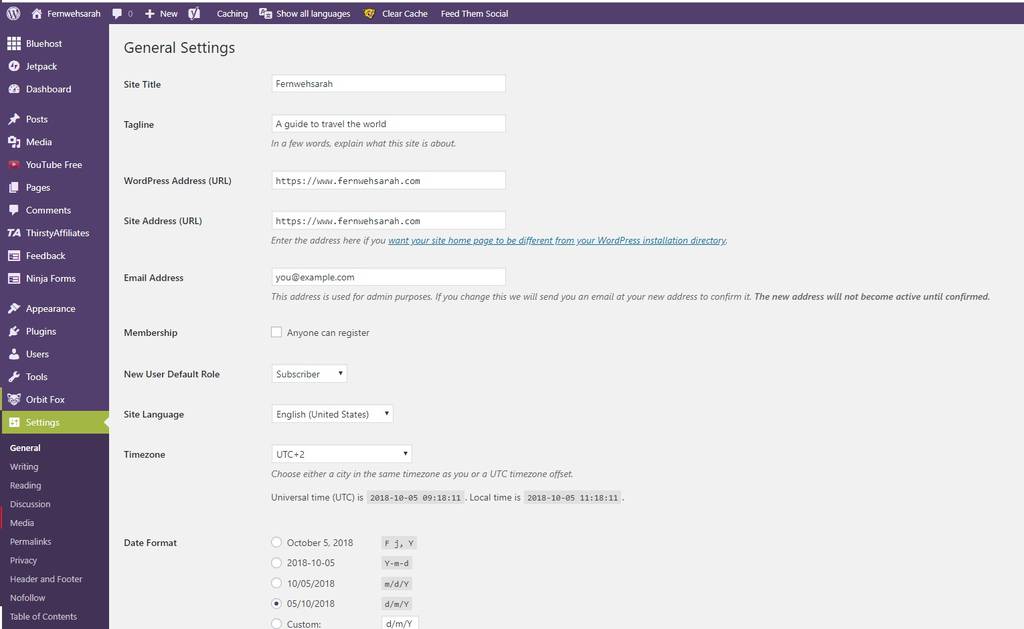
The second area that you should check is the general settings – make sure that there are a proper title and tagline to your site.
And decide on whether you want your site name to include the www. or not (it’s more a choice on what you like more than a technical thing). It’s one of the many decisions you simple have to take when you start a blog 🙂
Last but not least – this is where you change your site language and your time zone. As you can see, mine is set to English although I also write in German occasionally.
Decide on a category structure
Now we are getting to the first part that is about your actual content: your category structure!
When I started I was super confused about “tags” and “categories” – but then I read a really good explanation on wpbeginners about it.
Basically, if your blog were a book, categories are the “Table of Content” of your book and are hierarchical. In this analogy, tags are the index at the end of the book – they are not hierarchical and your content might show up under numerous ones!
So think about your main categories first (called “parent categories” in WordPress) when you are about to start a blog – and then choose fitting subcategories for that.
An article can be part of more than one category – and it always makes sense to add it to the most specific category, as well as the parent categories.
Example categories for a lifestyle blog
Let me give you an example of how a multi-topic lifestyle blog category structure could look like:
- Travel Destinations
- Europe
- France
- Italy
- Spain
- Asia
- Thailand
- Indonesia
- Philippines
- Europe
- General travel advice
- Fashion
- Latest trends
- Style guides
- Beauty
- Skin care
- Hair
- Makeup
- About my life
As you can see, not all parent categories have sub-categories. And some even go to a third level. Try not to go deeper than three levels as some theme’s menus won’t support them.
If I would now write an article about “The best photo spots in the Palawan, Philippines“, I would add it to “Travel Destinations”, “Asia” and “Philippines”. And if it’s about Outfits for Disneyland, I would add it to “France”, “Europe” and ” Travel Destinations” as well as “Style guides” and “Fashion”. I think you get the concept! 🙂
Create some first pages
Now that we have signed up for hosting, chosen a theme and decided on a category structure, it’s time to create some pages for your blog.
The difference between pages and posts
First of all, let me shortly explain to you the difference between “Posts” and “Pages”. Writing them works essentially completely the same (and they both have a unique URL), but it’s important to know the difference right from the beginning.
It basically burns down to two points from a technical point of view:
- Pages DO NOT have a category, posts always have at least one category
- Posts show up on your front page under “Recent Posts”, pages do not
Think of “posts” as articles in a newspaper. “Pages” instead, are there to inform readers about stuff that does not change. Typical pages of a blog are stuff like “About me” and the legal pages.
Blank pages to create right at the beginning
I want you to set up some blank pages now because we will need them for your menu. You can still fill in all the content later by editing these pages!
Go to “Pages > Add New” to create the following pages:
- About (me/us)
- Imprint
- Contact
WordPress already creates a page called “privacy policy” for you – so you should not have to do this on your own. Add it if it’s missing!
Set up your menu based on your categories
Once you have decided on your categories, it is time to set up your blog menu. One thing that is a bit difficult to understand for some people starting with WordPress are the different elements that a menu can have:
WordPress allows you to create menus that contain:
- Categories and Subcategories
- Single Pages
- Single Posts
- Individual links
Not that you CANNOT create menu items from tags! That’s why it’s important to think about the Categories first!
In order to create your first menu, click on “Appearance > Menus”.
You first need to create a new menu and then you can add items (e.g. your categories and pages) to it.
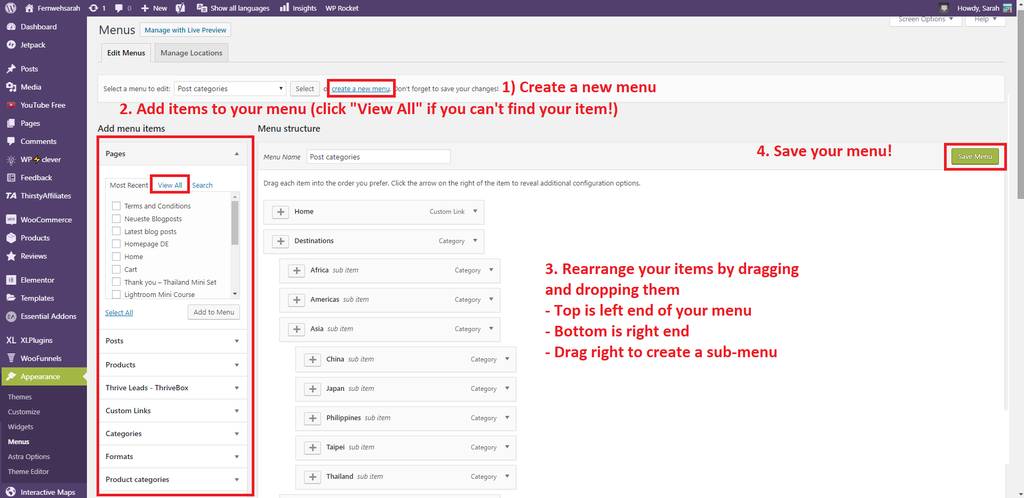
Once your menu items are on your work panel, you can simply drag and drop your pages or categories around to create your menu. If you drag items to the right, you create sub-menus! Don’t forget to hit save when you’re done!
Your simple first menu could be something like:
- Home (Custom link to your homepage)
- Category 1 (e.g.Travel)
- Sub-category (e.g. Asia)
- Sub-category (e.g. Europe)
- Sub-category (e.g. Australia)
- Category 2 (e.g. Fashion)
- Sub-category (e.g. Outfit guides)
- Sub-category (e.g Shop reviews)
- Category 3 (e.g. Beauty)
- About me (Page)
- Contact (Page)
By the way, you can create more than one menu – I have created a second menu for my legal pages for example. (We’ll get to this soon)
Set up your widgets (sidebar + footer)
As mentioned already, your website contains a header, a footer – and in most cases also a menu and a sidebar. Setting up those areas is a key step to start a blog.
Widgets are small applications that help you place some specific content in different areas of your site. They usually come with some plugins you install. You can change them under “Appearance”>”Widgets”
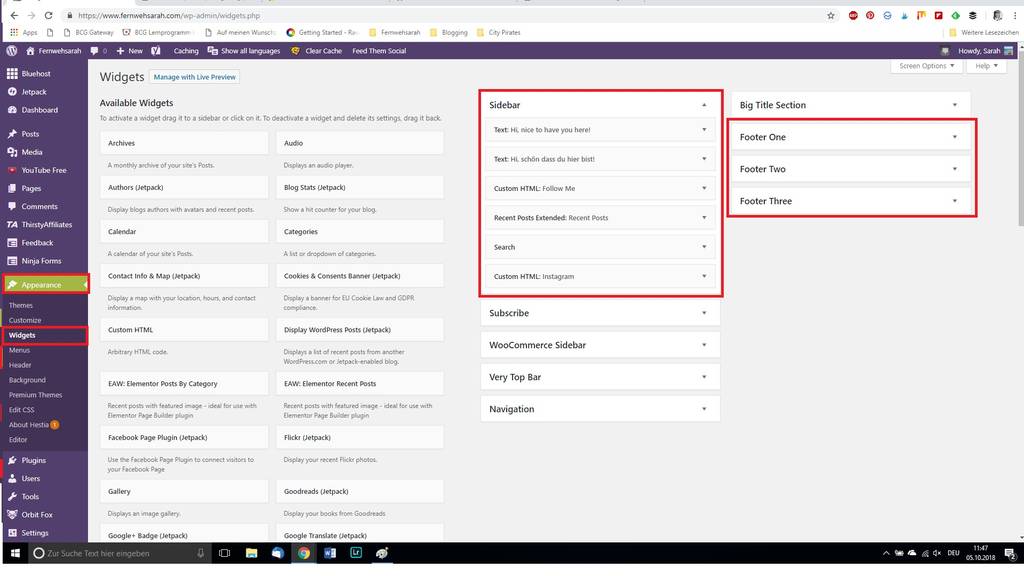
As you can see, my previous theme Hestia contained three Footer areas – and also came with a “Very Top Bar” and some other areas where widgets can be placed.
You can simply drag the available widgets (left) into the areas (right) and then change the individual settings of the widget. Trust me, it’s super easy and intuitive!
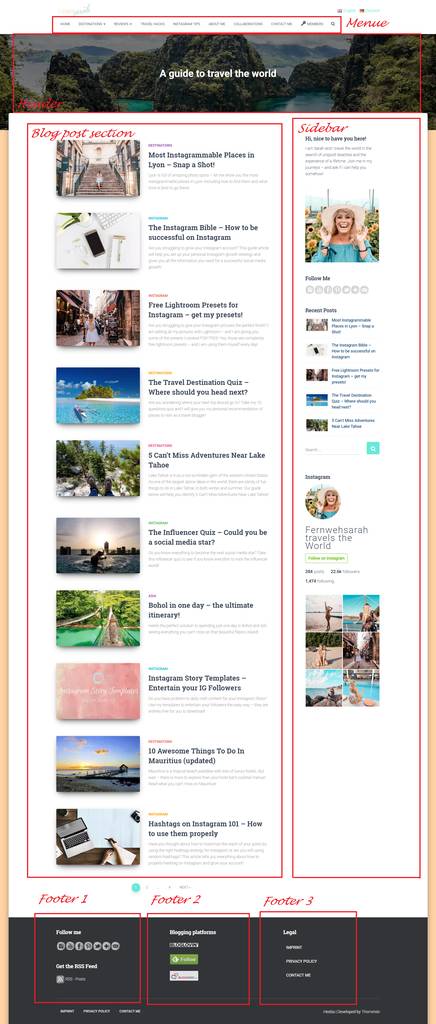
But wait, let me show you where those areas actually are on your blog! This is an old screenshot from my website where I highlighted the areas so that you understand where to find them. My current setup is a bit more complicated as I work with the Elementor theme builder, so I’ll still show you the old look.
Depending on your theme it will look a little different – your sidebar might be on the left side or your menu might be below the header. But in general, a blog always has a header on top, a body and a sidebar and a footer.
Fulfill the legal requirements of your country
This is a tricky one as it is different from country to country!
Most countries require you to at least have an imprint with some basic information about the owner of the blog.
As the GDPR has been a huge topic in the blogging community this year, you might have heard about the requirement to have a privacy policy as well.
Please inform yourself about the requirements for your country right away as soon as you are about to start a blog! Don’t postpone this – this can COST YOU MONEY otherwise. As I am no lawyer this paragraph can only be a very basic answer to what you might have to do!
For Germany, I found some very helpful generators that basically make the whole process super easy and they are free to use for personal websites! Something like this might exist for you as well!
Imprint generator (German only)
This is where I got my imprint from: https://www.impressum-generator.de/impressum-generator/
It’s done in minutes and is free for personal use. After using it, simply add the content to the page you created before. As the legal requirement in Germany is that the imprint can be found anywhere on your website with two clicks. A great way to solve this is by creating a second menu and adding it to the footer.
Privacy policy generator (German only)
Generating a privacy policy (German: Datenschutzerklärung) is much more work – but luckily there is a really good free generator as well: https://datenschutz-generator.de/
Same as with the imprint – copy the content to the page named “privacy policy”! This also needs to go into your footer, directly after the imprint.
Install important plugins
So now we are getting to the part where you will really feel the power of WordPress: Plugins! In order to start a blog and make sure that it has awesome functions, you need…plugins!
Plugins enlarge the functionality of your WordPress blog – and there are myriads of free plugins available! This is also why I recommend NOT using WordPress.com – you can only use plugins there with the super expensive business plan! On self-hosted WordPress.org this is free – as long as the plugin is free!
Some of the plugins I use are free – and for some of them, I paid money. If you really want to be serious about your blogging – I suggest you invest a little bit on plugins.
But it’s also okay to first start with the free ones – just think about some upgrades later. Plugins really have been key to making my blog be what I want it to be.
How to install WordPress Plugins
Luckily, installing WordPress Plugins is rather easy! First, you click on “Plugins>Add new”. You can then choose to upload a plugin or to search the WordPress directory.
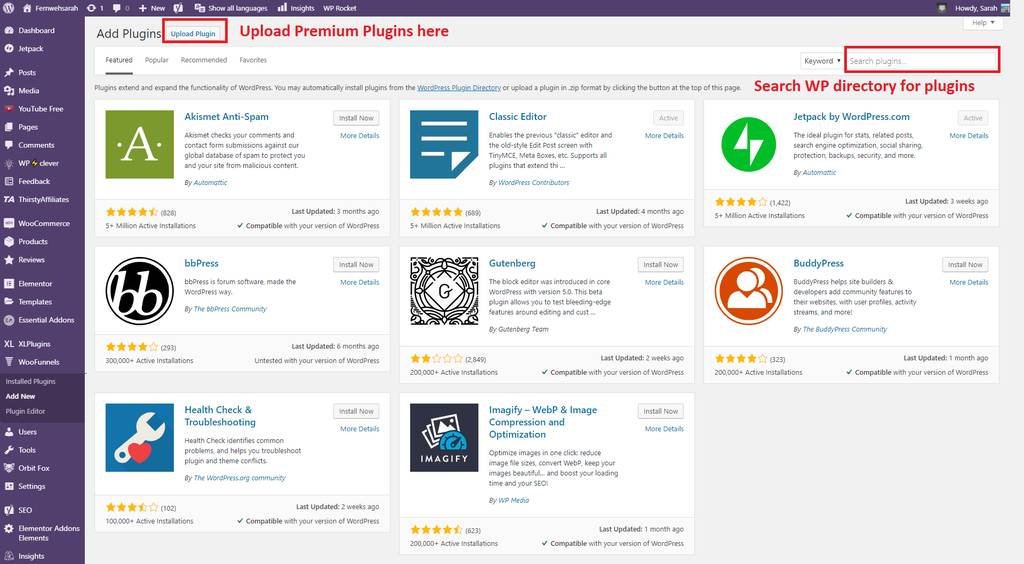
In general, you should try to search plugins in the WordPress directory. If you download plugins somewhere else and upload them directly, there’s a risk of Malware infection of your download.
Only when you purchase premium plugins from a seller you trust – and only then (!) – should you use the “Upload Plugin” option! Free plugins that can be trusted will ALWAYS be available in the WP directory!
10 Free WordPress Plugins to install right away
In order to start your blog, here’s a list of the 10 free plugins you should install right away:
- Autoptimize
- Antispam Bee
- Elementor
- Easy table of contents
- Google Analytics for WordPress by Monsterinsight (pre-installed with Bluehost)
- Smush
- Social Warfare
- Wordfence Security
- WP Supercache
- Yoast SEO
Register for Mailerlite and set up a basic mailing list
If you want to run a successful blog, you should give your readers the option to sign up for updates from your blog right away (hint – sign up for mine NOW! 😉 )
You might think: “Hey, I am just about to start a blog – this is too early!”. Trust me, it’s not. When your blog grows, you will focus more and more on this email list – those are your true fans and the people that are most likely to be interested in a new blog post you release! And you want to be there for them from the first minute on!
There is a couple of options which provider to use for email lists, but I personally recommend using Mailerlite when you are just starting your blog! Why? Because it is completely for free until you have 1,000 subscribers!
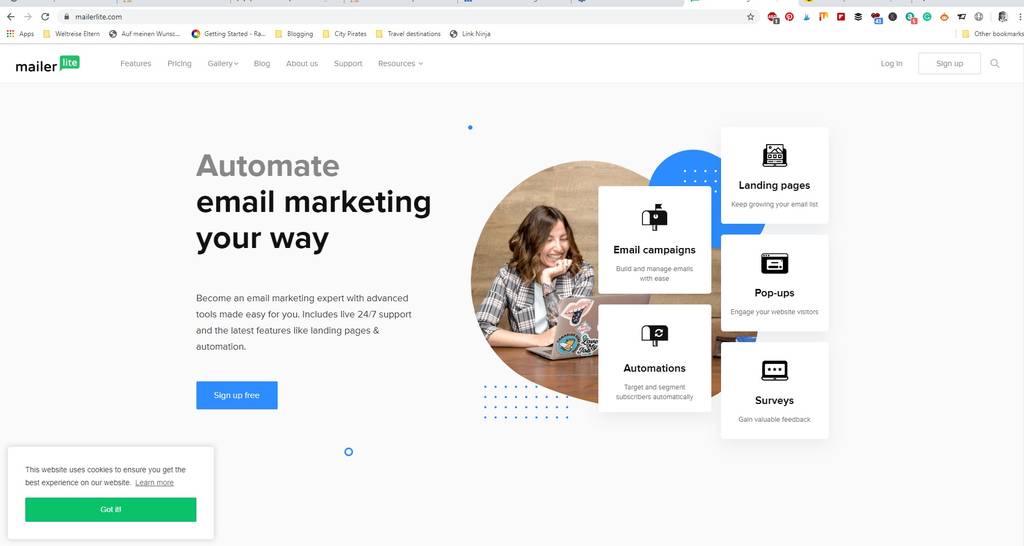
I have previously used and recommended Mailchimp – but once you surpass their free 2,000 subscribers they get ridiculously expensive (49,99$ for 2.-2.5k subscribers, 74,99$/month for 2.5-5k subscribers).
Mailerlite (15$/month 1-2.5k subscribers, 30$/month for 2.5k-5k subscribers) is much cheaper and after making the change (you don’t want to do this later, trust me…) I can also say that they are much more powerful and easier to use than Mailchimp.
By the time you surpass those 1,000 subscribers, your blog is gonna make you some money already anyway and you won’t care about the 15$/month. And once you have 2,500 subscribers, you will be so happy you are not with Mailchimp.
That’s why I would recommend you to start with Mailerlite right away!
Submit your new blog to Google Search Console
Unfortunately, we are not yet finished with the tech stuff! In order to make your post visible to Google, you need to submit your blog to Google Search Console! Those steps are simply crucial steps you need to do when you start a blog – but it’s a one-time effort.
You will also need to submit a sitemap of your blog to it to make it easier for Google to index your stuff.
It’s not fun – but why should you blog if you don’t make it easy for people to actually find and enjoy your content?
Luckily, Yoast SEO Plugin (see above) can help you with it – and there is some good tutorials out there on these steps:
- Shoutmeloud – Submit your blog to Search Console
- Yoast Tutorial – Submission to Search Console
- Yoast – How to Submit your Sitemap
Start writing content and celebrate!

Did you already feel like you’ll never get to this step? Well, congratulations, you made it! You can now start blogging officially!
If you are looking for some advice on how to write an awesome blog post – hop over to my Pinterest board where I collect valuable articles from other bloggers on this topic! And don’t forget to follow me on Pinterest 😉
Creating pages using Elementor (not posts!)
Update 01/2020: I am NOT using Elementor anymore to create my blog posts. Instead, I am using the native Gutenberg editor as this has dramatically improved since it was launched. But for creating pages, I still LOVE Elementor
Elementor is the most advanced page builder out there – meaning you can completely change how your blog pages appear. It’s a drag-and-drop editor that directly shows you the results of what your page will look like. And it makes rearranging text blocks and images so much easier!
There is a ton of awesome Youtube tutorials out there what Elementor is capable of – and that is A LOT!
And there are numerous Addon Plugins available that will make Elementor even more powerful – many of them are for free! Often, there’s a premium version with additional functions available as well
- Elementor Addon Elements (Free)
- Essential Addons for Elementor (Free / 30$)
- Elementor Addons Sizzify Lite
- JetElements (17$)
- Orbix Fox Companion
Elementor itself also has a very reasonably priced pro version – which I think is totally worth the money.
It’s actually one of the few plugins where I recommend buying the premium version very very soon in your “blogging career”. And that’s because they include Elementor Theme Builder in the pro version as well as the popup builder. This gives you the option to truly customize your page and change almost anything about your blog’s appearance!
Further helpful resources to start a blog
There are a few websites that definitely helped me manage some of the technical aspects of getting my blog up and running – and I think they will be a good source of information for you to start a blog as well!
Free WordPress Advice:
And of course, you can always send me a message on Instagram or a mail ([email protected]) to ask more questions! Also, leave a comment with your blog once you set it up – I will definitely check it out!
Pinning is sexy (and helps others 😉 )!